
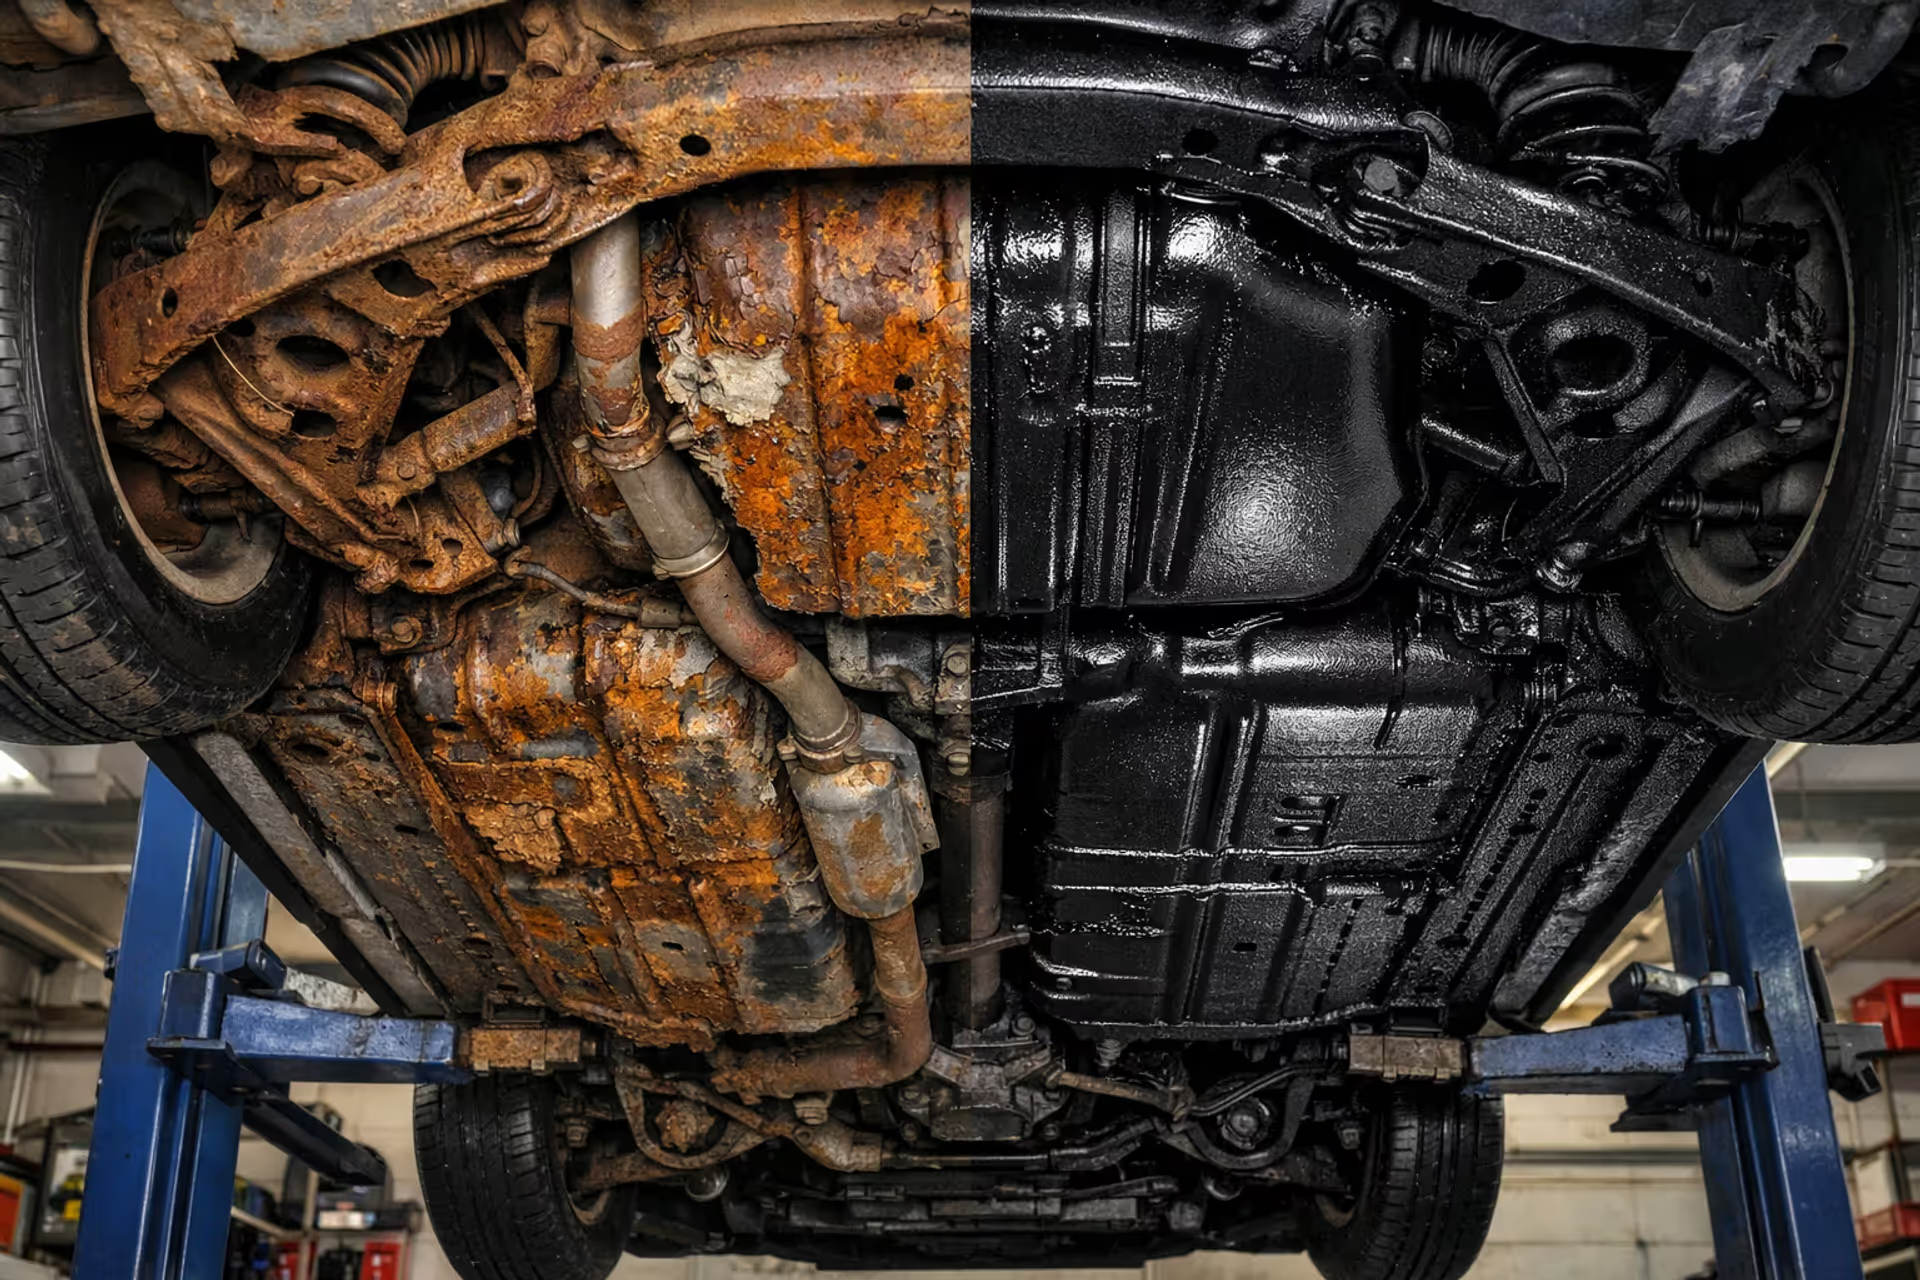
Car undercarriage on a lift showing contrast between corroded rusty frame rails and clean protected underbody coating side by side
Complete Rust Prevention Guide: How to Protect Your Vehicle From Corrosion

Content
Content
Your car won't send you a text message when rust starts eating through the frame rails. There's no check engine light for corrosion, no beeping alarm when moisture begins its slow destruction of metal components. Most drivers spot the problem only after paint bubbles appear on door edges or when brown streaks start trailing down from body seams—and by then, the damage has been quietly spreading beneath the surface for months or even years.
Vehicle owners in places like Grand Rapids, Portland (Maine), or Monterey deal with wildly different rust triggers, but the underlying chemistry stays the same: expose iron to oxygen plus water, and you get iron oxide. That's rust. It expands as it forms, cracking whatever paint or coating sits on top, which invites even more moisture into the party.
This guide walks through maintenance routines that can push a vehicle's useful life from the typical eight years to twenty or beyond. The cars that make it two decades aren't necessarily built better—their owners just applied protective treatments consistently and caught problems while they were still fixable.
Why Rust Forms on Vehicles and Which Parts Are Most Vulnerable
Metal corrosion happens through a straightforward electrochemical reaction. When bare steel makes contact with water that's got dissolved salts or acids in it, electrons jump from iron atoms over to oxygen molecules. This oxidation process creates iron oxide, which takes up more physical space than the original metal did. That expansion cracks paint layers and speeds up further deterioration.
Environmental Factors That Accelerate Metal Oxidation
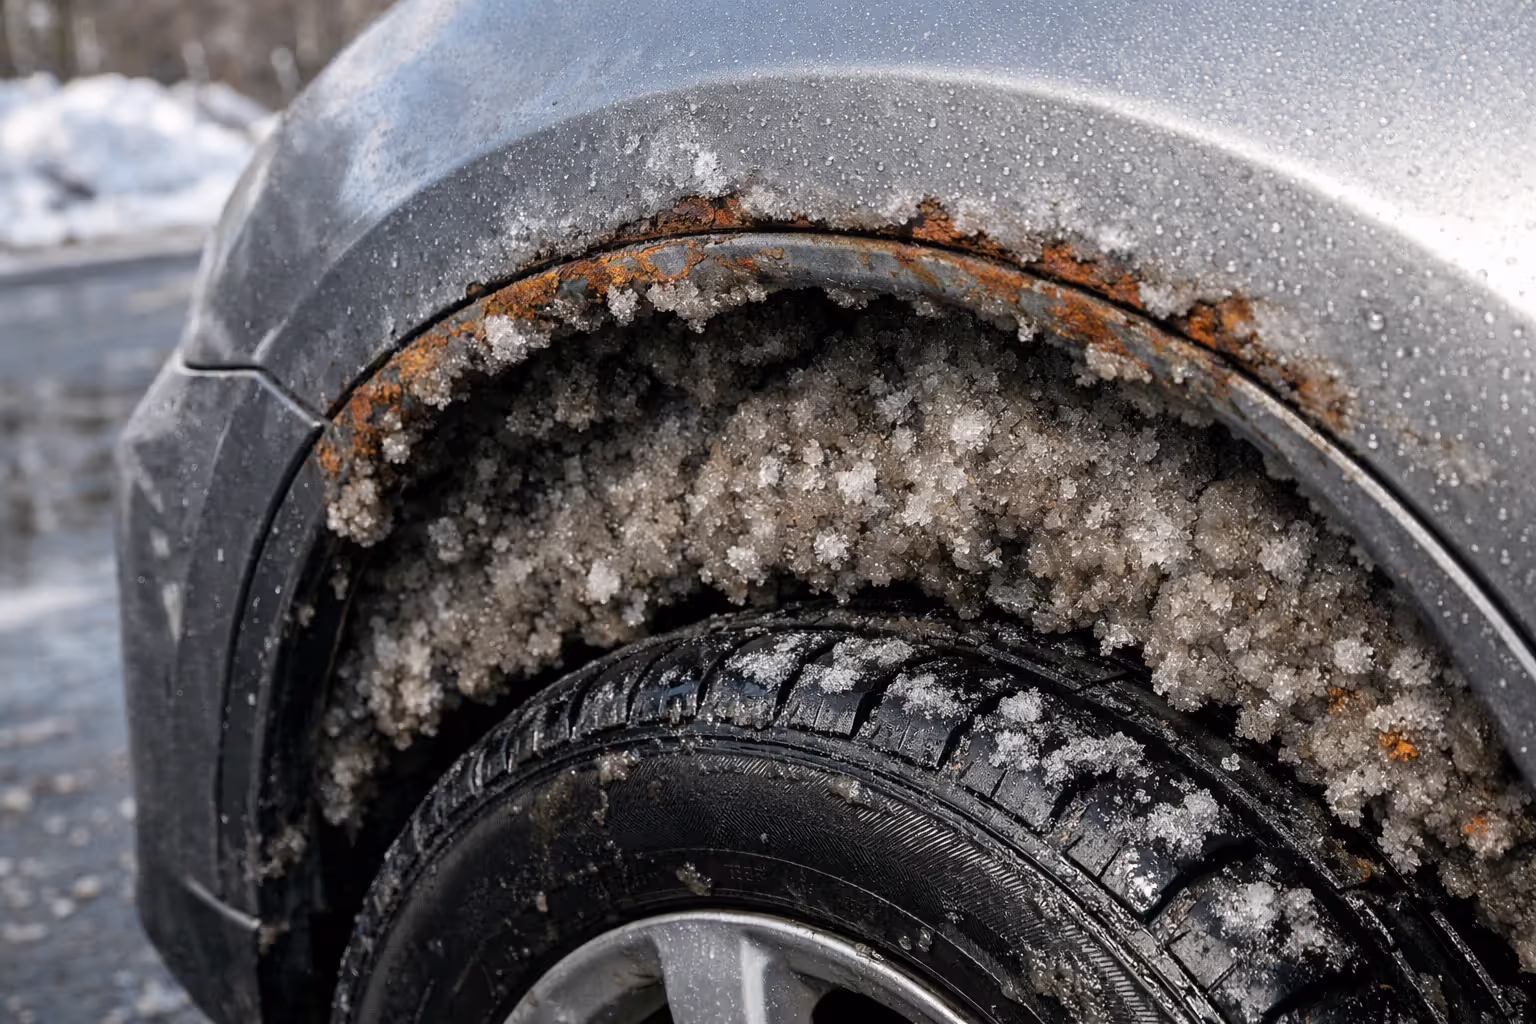
Road salt stands as the biggest rust accelerator across the northern United States. Calcium chloride and sodium chloride don't just melt ice—they create an electrolyte bath that cranks up electron transfer by 300-500% compared to plain water. Drive through a single winter in Buffalo or Madison, and your vehicle faces more corrosive stress than it would see in five Phoenix summers.
Coastal humidity delivers a different problem: constant moisture without the occasional rinse that inland vehicles get from rain. Salt spray settles into every crack and gap, then stays there indefinitely. Park within three miles of the Atlantic or Pacific, and you're dealing with accelerated rust regardless of whether temperatures ever drop below freezing.
Author: Lena Prescott;
Source: shafer-motorsports.com
Industrial areas add their own twist. Sulfur dioxide and nitrogen oxides from manufacturing plants mix with atmospheric moisture to form weak acids. Vehicles in places like northwest Indiana's steel corridor or Houston's petrochemical zones get exposed to acidic condensation that etches through factory paint in just a few months.
Temperature swings matter more than you'd think. Freeze-thaw cycles trap water in panel joints, then ice crystals expand and crack the sealants holding those joints together. Places with daily temperature changes of 40°F or more—think high desert areas or mountain states—stress metal connections and create microscopic channels for water to sneak through.
High-Risk Zones: Where Rust Starts First
Different parts of your vehicle face dramatically different corrosion risks. Knowing these patterns helps you focus inspection time and protection efforts where they'll matter most.
| Vehicle Location | Rust Risk Level | Typical Onset Timeline | Prevention Difficulty |
| Frame rails (front section) | Critical | 3-5 years (salt states) | Moderate (needs lift or ramps) |
| Wheel wells (inner fenders) | Critical | 2-4 years | Low (you can see and reach them) |
| Rocker panels (pinch welds) | Critical | 3-6 years | High (enclosed hollow sections) |
| Door bottoms (inner structure) | High | 4-7 years | Moderate (keeping drains clear helps) |
| Trunk floor (spare tire well) | High | 5-8 years | Low (pop the trunk, lift the mat) |
| Exhaust system hangers | High | 2-5 years | Low (easy to spot during oil changes) |
| Subframe mounting points | Critical | 6-10 years | High (structural, often hidden) |
| Hood/trunk edges (hemmed seams) | Moderate | 7-12 years | Moderate (capillary action sucks moisture in) |
| Brake lines and fuel lines | Critical | 5-8 years (safety issue) | High (need mechanical knowledge) |
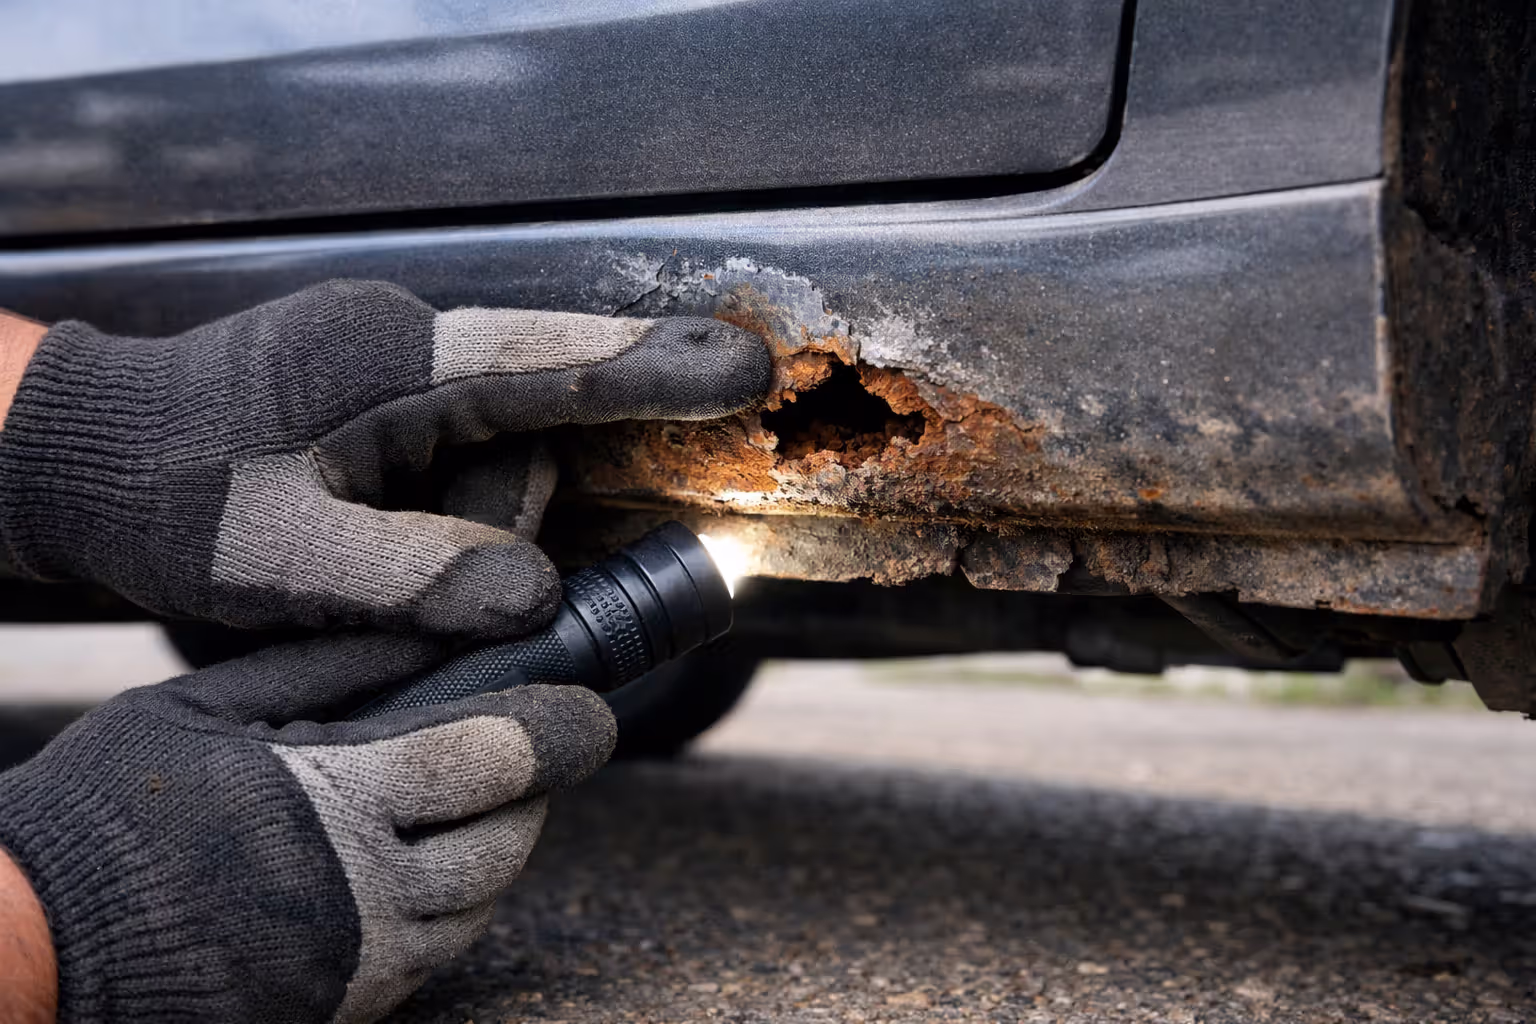
Frame rails corrode first because they ride lowest to the road surface, catching salt spray head-on while staying perpetually wet from splash-back. Most manufacturers put pretty thin coatings on these areas, basically assuming you'll add extra protection yourself.
Wheel wells combine three nasty factors: rocks and road debris chip away protective coatings, tires constantly spray water and slush, and packed snow sits there for hours after you park. The spot where your plastic fender liner meets painted metal develops rust holes faster than just about anywhere else on the body.
Rocker panels rot from the inside out. These hollow box sections collect moisture through worn-out door seals, then trap it because drain holes get plugged. You'll only see bubbles on the surface after internal corrosion has already thinned the metal to the point of structural failure.
Proven Corrosion Protection Methods for Different Climates
Stopping rust means matching your treatment type to whatever exposure conditions your vehicle actually faces. There's no magic spray that handles everything equally well.
Barrier Coatings vs. Sacrificial Anodes
Barrier coatings work by physically blocking metal from touching oxygen and moisture. This category includes rubberized undercoatings, ceramic-reinforced paints, and polymer sealants. They're effective as long as they stay intact. But one stone chip that cuts through to bare metal creates a corrosion site that spreads underneath the coating, often invisible until serious damage has happened.
Hard-film barriers like polyurethane or epoxy resist stone chips better but they crack when metal flexes. Flexible rubberized coatings absorb impacts without cracking, but they'll trap moisture against metal if you spray them over existing surface rust or metal that wasn't properly cleaned first.
Sacrificial anode protection relies on zinc or magnesium coatings that corrode instead of the steel underneath. Galvanized metal uses this principle—the zinc layer oxidizes first, protecting the iron even when scratched through. Cold-galvanizing sprays offer similar protection for repair work, though they need thorough surface prep to bond correctly.
Electronic rust modules claim they'll protect your vehicle by running small electrical currents that somehow reverse oxidation. Multiple controlled studies from automotive engineering departments have tested these devices. They provide zero measurable benefit. The current density needed for actual cathodic protection exceeds what these battery-powered boxes deliver by several orders of magnitude. It's physics, not opinion.
"Combining an initial barrier with annual oil treatment reapplication gives us the best results. In our testing, vehicles receiving both methods stay rust-free for 15-20 years, while untreated vehicles in identical conditions show significant corrosion by year 5-8. The biggest mistake people make is thinking one application lasts forever—rust prevention needs regular maintenance just like your engine oil does." — Dr. Jennifer Hartmann, Materials Science Engineer, Automotive Corrosion Research Institute, Detroit
— Lena Prescott
Oil-Based vs. Wax-Based Treatments
Oil-based rust products penetrate into seams, spot welds, and hollow cavities through capillary action. Apply products like Fluid Film, Krown, or Woolwax annually, and the light petroleum distillates displace moisture while offering self-healing properties—if something scratches through the film, oil migrates over to reseal the gap. The downside: these stay semi-liquid, dripping for a day or two after application and picking up dust on exposed surfaces.
Wax-based treatments (Waxoyl, Dinitrol) harden after you apply them, creating a tougher coating that won't drip or collect dirt. They stick exceptionally well to vertical surfaces and painted body panels. However, hardened wax can't self-heal or creep into tight seams as effectively. Stone impacts can chip away wax coatings, leaving bare metal exposed.
Your climate should drive this choice. Oil-based products excel in freeze-thaw environments because they stay fluid even at subzero temperatures, continuously creeping into new gaps as metal contracts. Wax treatments perform better in hot, dry climates where hardened coatings won't soften and drip off.
Coastal vehicle owners get the best results from lanolin-based products (derived from sheep wool oils) that resist salt water penetration better than petroleum-based options. The natural waxes in lanolin create hydrophobic barriers that actually shed moisture rather than just blocking it.
Winter Salt Damage Prevention: Strategies for Snow Belt States
Road salt exposure represents the single biggest rust trigger for vehicles across the northern tier of states. Getting your timing right and establishing smart washing habits can dramatically slow corrosion rates.
Pre-Season Application Timing
Get underbody protection applied between late September and mid-November, after summer dust has washed away but before road crews start throwing salt. Metal surfaces need to be bone dry—trapping moisture underneath oil or wax treatments accelerates corrosion instead of preventing it.
Application temperature matters quite a bit. Most products need surface temps above 50°F to flow properly and bond correctly. Schedule your treatment during an Indian summer warm spell rather than waiting until those November cold snaps hit.
Pre-winter application gives treatments time to cure and bond before salt exposure starts. If you apply products in January over existing salt deposits, you're just sealing corrosive material against the metal. That provides exactly zero protection.
Here's a two-stage approach that works well: spray exposed underbody components with hard-film coating in October, then hit cavities and seams with penetrating oil in November. This combines stone-chip resistance with effective moisture displacement.
Author: Lena Prescott;
Source: shafer-motorsports.com
Post-Drive Washing Protocols
How quickly you remove salt matters more than how much water you use. Rinse underbodies within 24 hours of driving on salted roads—before the brine solution concentrates through evaporation. Dried salt residue takes roughly ten times more water to remove than fresh spray does.
Focus on wheel wells, frame rails, and suspension components rather than just washing body panels. Most automatic car washes don't adequately clean underbody areas where corrosion actually starts. Those self-service bay pressure washers give you better access if you aim the wand upward into cavities.
Water temperature makes surprisingly little difference for salt removal—cold water dissolves road salt just fine. Hot water helps cut through oil and grease but doesn't improve chloride elimination.
Skip washing entirely when temperatures will drop below freezing within the next 12 hours. Water that gets trapped in door jambs, trunk seals, and body seams will freeze, expanding and cracking protective sealants. This creates brand new pathways for moisture infiltration that accelerate spring corrosion.
Monthly underbody rinses throughout winter cut salt accumulation by 70-80% compared to vehicles that only get washed at season's end. The cumulative effect matters way more than single intensive cleanings.
The number one misconception about road salt damage is that a single spring wash undoes a whole winter of exposure. In reality, corrosion begins within hours of salt contact—not days, not weeks. The vehicles we see surviving 200,000 miles in the Rust Belt are the ones whose owners wash underneath consistently all season long, not just once at the end
— Mark Savageau
Underbody Protection Maintenance Schedule and Best Practices
Rust prevention needs recurring attention rather than one-and-done application. Setting up a schedule based on how severe your exposure is prevents corrosion before it gets started.
DIY Application Techniques
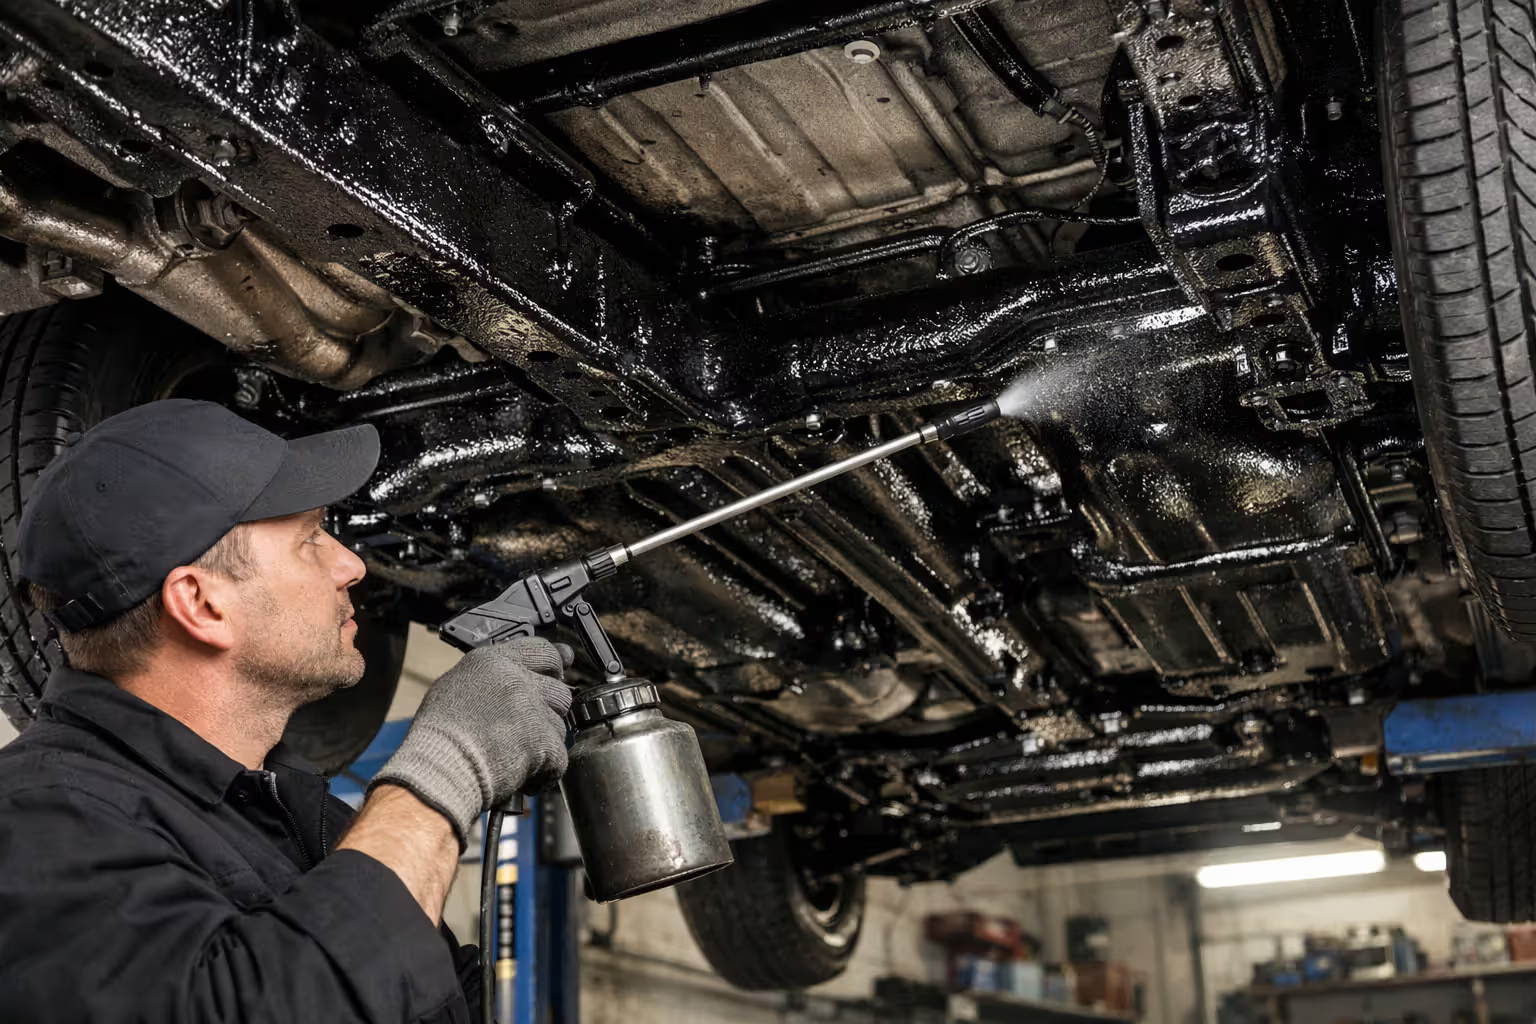
Applying cavity waxes and oil sprays at home requires some basic gear: a pump sprayer or air compressor with undercoating gun, jack stands or ramps, and extension wands for reaching enclosed sections.
Start with wheel well interiors—these are the most accessible high-risk spots. Pull the wheels off for complete access to inner fenders and suspension parts. Wire-brush any surface rust you find, then apply treatment in overlapping passes until surfaces look uniformly coated.
Treating cavities demands a different approach. Drill small access holes (5/16 inch works well) in rocker panels, door bottoms, and enclosed frame sections if factory access holes don't exist. Insert extension wands and spray while slowly pulling back out to coat entire internal surfaces. Seeing some drips from drain holes confirms you've filled the cavity adequately.
Door bottoms contain multiple internal baffles creating separate chambers. Each chamber needs individual treatment through its own access point. Miss even one chamber and rust develops there undetected.
Frame rail treatment works best from underneath with the vehicle up on jack stands. Spray forward-facing surfaces heavily since these catch the most road spray. Don't neglect the top surfaces of frame rails either—they collect moisture from engine bay splash.
Give it 48 hours drying time before driving in wet conditions. Fresh oil treatments need time to displace moisture and migrate into seams before getting exposed to water.
Professional Service Intervals
Commercial rust prevention shops provide thorough application with lift access and industrial spray equipment. Professional treatment pricing reflects labor time more than material costs—expect 2-3 hours for complete service.
Annual professional application suits most climate conditions. Severe salt exposure (coastal areas or snow belt) might justify twice-yearly service: fall before winter salt season starts, then spring after salt season ends to replenish protection that got worn away by road spray and washing.
Make sure shops actually clean underbodies before applying treatment. Spraying over existing dirt and salt accomplishes nothing—you're simply wrapping corrosive material against the metal.
| Treatment Method | Average Cost | Protection Longevity | Skill Required | Effectiveness Rating |
| DIY oil spray (annual) | $60-120 materials | 8-12 months | Low to moderate | 8/10 (when done thoroughly) |
| DIY wax treatment | $80-150 materials | 18-24 months | Moderate | 7/10 (cavity access is tricky) |
| Professional oil spray | $120-180 | 10-14 months | N/A | 9/10 (equipment makes the difference) |
| Professional wax system | $400-800 | 24-36 months | N/A | 8/10 (excellent but pricey) |
| Dealership undercoating | $500-1200 | 36-60 months | N/A | 6/10 (often sprayed over factory coating without proper prep) |
| DIY rubberized coating | $100-200 materials | 48+ months | High | 5/10 (traps moisture when applied wrong) |
Professional services earn their cost through complete coverage and proper surface preparation. DIY approaches save money but demand diligence to match professional thoroughness.
Moisture Prevention Vehicle Checklist: Drainage and Ventilation
Trapped water causes more rust damage than external spray exposure. Factory-designed drainage systems fail when they get clogged, transforming protective channels into corrosion incubators.
Clearing Drain Holes and Channels
Door bottoms have drain holes at each corner—typically 3/8-inch openings with rubber flaps. These clog up with dirt and debris, letting water pool inside door structures. Push a wire or small screwdriver through each hole quarterly to verify they're draining.
Rocker panels include drain holes where the panel meets the wheel well—usually covered by plastic plugs or rubber grommets. Pop these out annually and flush channels with water to clear accumulated sludge.
Sunroof drains route water from roof tracks down through A-pillar or C-pillar channels to exit underneath the vehicle. These tubes kink or separate at joints, dumping water inside door panels or trunk areas instead. Test them by pouring a cup of water into sunroof tracks while watching for exit flow at ground level.
Cowl drains (sitting beneath the windshield) channel water away from the cabin air intake. Leaves and debris dam up these drains, causing water to overflow into door hinges and fender areas. Remove the cowl cover panel annually and clear all debris from drain channels.
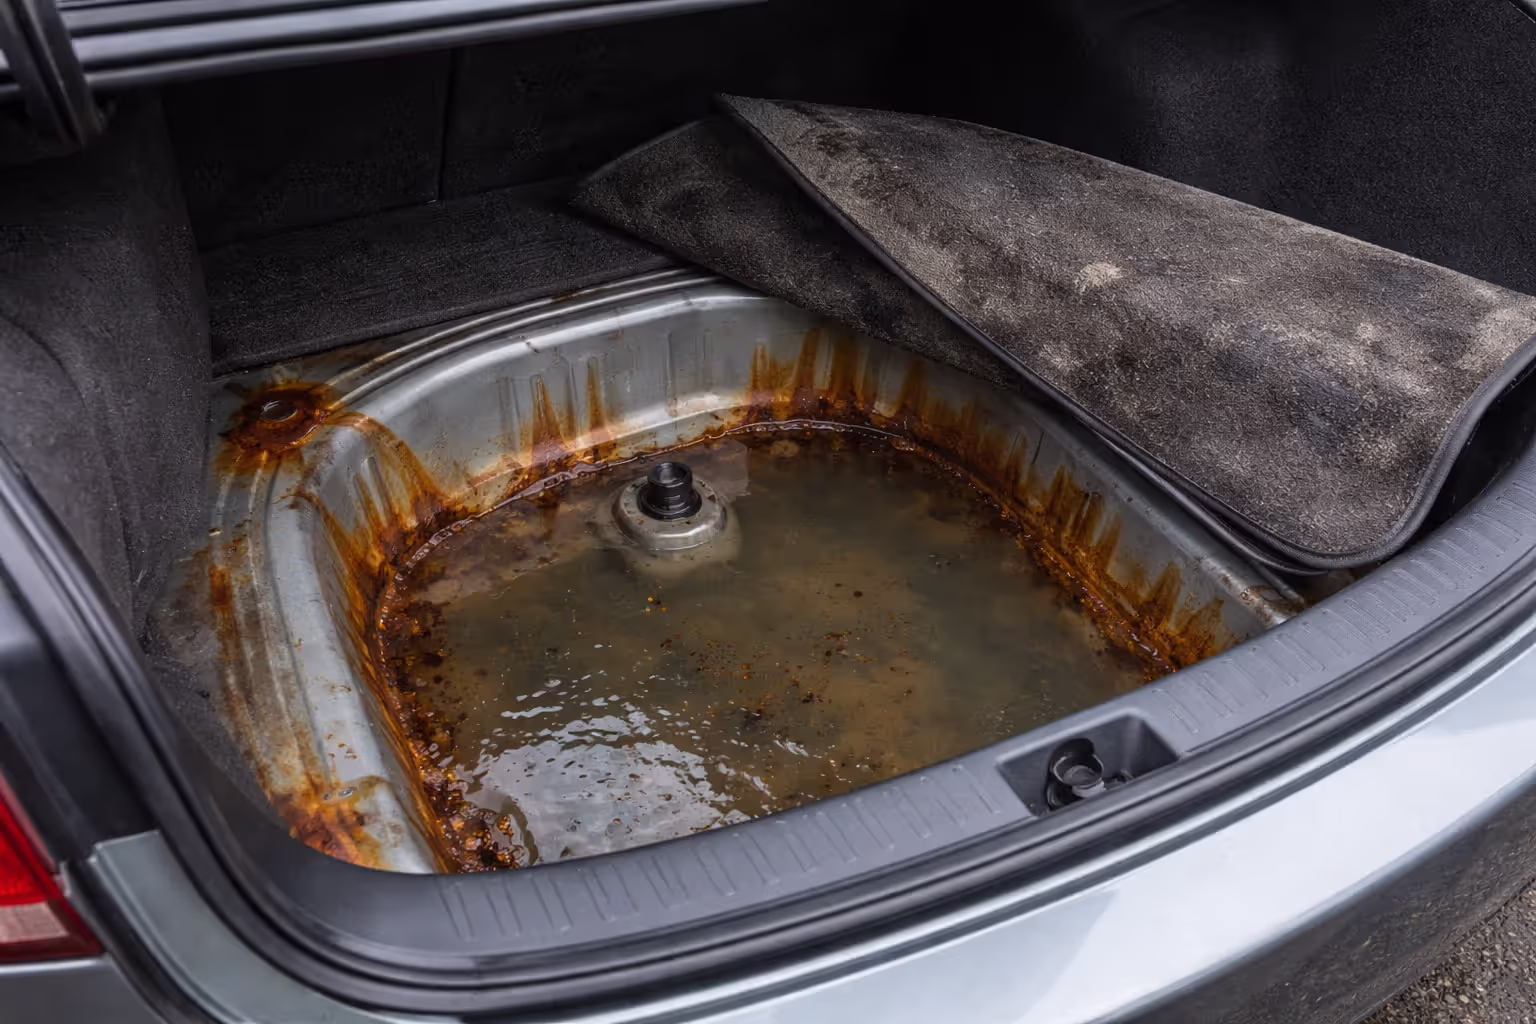
Trunk and hatchback seals develop compression set over time, allowing water intrusion during car washes or heavy downpours. Water pools in spare tire wells—often the first spot to rust completely through on older vehicles. Check trunk carpets for dampness after rain. Wet carpet means failed seals needing replacement.
Interior Humidity Control
Cabin moisture from wet shoes, spilled drinks, and failed HVAC drains creates corrosion from the inside out. Floor pan rust often starts on the interior surface where carpet holds moisture directly against metal.
Pull up floor mats and carpets annually to check for dampness and surface rust on floor pans. Wet carpet acts like a wick, continuously drawing moisture into contact with metal. Dry everything thoroughly before putting it back.
HVAC evaporator drains exit underneath the passenger side dashboard. When they clog, condensation overflows into carpet instead of draining outside. Finding a puddle on the passenger floor after running AC indicates a blocked drain. Clear it by pushing wire through the drain tube from underneath the vehicle.
Crack windows slightly when parking in humid conditions to allow air circulation. Sealed cabins trap moisture that condenses on cold metal surfaces overnight. A quarter-inch gap provides adequate ventilation without creating security concerns.
Author: Lena Prescott;
Source: shafer-motorsports.com
Desiccant bags (silica gel or calcium chloride) absorb cabin moisture in climates with persistent humidity. Toss them under seats and in trunk areas, replacing when they become saturated. This simple step prevents condensation on interior metal surfaces during temperature swings.
How to Inspect Your Car for Early Rust Damage (Seasonal Checklist)
Catching rust early lets you repair it before structural integrity gets compromised. Fixing surface oxidation costs maybe twenty bucks; repairing perforated frame rails runs into thousands.
Surface Rust vs. Structural Corrosion
Surface rust shows up as brown or orange discoloration on metal without any depth penetration. It wipes away partially with a rag, leaving staining but no pitting. This stage responds well to wire brushing, rust converter treatment, and repainting. Leave it alone, and surface rust advances to scale rust within 6-18 months.
Scale rust forms layered oxidation that flakes off when you scrape it, revealing pitted metal underneath. Corrosion has penetrated the metal surface, creating permanent texture damage. Scale rust requires grinding down to bare metal before treatment works. Structural strength stays adequate at this stage, but the window for simple repair has closed.
Penetrating rust creates actual holes through metal panels. What looks like a small paint bubble often conceals extensive internal corrosion—visible damage represents maybe 20-30% of actual metal loss. Penetrating rust demands panel replacement or welded patches. When it shows up on structural components like frame rails or subframe mounting points, vehicle safety becomes questionable.
Structural corrosion affects load-bearing components: frame rails, suspension mounting points, subframe sections, and floor pan reinforcements. Surface appearance might seem minor, but thickness measurements reveal 40-60% metal loss. Vehicles with structural rust often fail safety inspections and may get deemed unsafe to operate.
What to Look for During Visual Inspections
Run seasonal inspections in spring (after salt season wraps up) and fall (before applying winter protection). Each inspection takes 30-45 minutes with the vehicle up on jack stands or ramps.
Underbody inspection points: - Frame rails: Watch for surface scaling, especially at front sections and behind front wheels where salt spray concentrates - Crossmembers: Check where they bolt to frame rails—these joints trap moisture and corrode first - Suspension components: Control arm mounting points, shock towers, and spring perches experience stress corrosion - Exhaust system: Hangers and heat shields rust quickly but rarely affect safety; focus instead on exhaust manifold studs and catalytic converter mounting - Fuel and brake lines: Surface rust is normal, but flaking scale or greenish corrosion signals impending failure
Body panel inspection points: - Wheel well lips: Run your hand along the inner edge where fender meets wheel well—rust starts here as surface bubbles - Rocker panels: Press firmly along the bottom edge—soft spots indicate internal perforation even when paint still looks intact - Door bottoms: Open doors and check the bottom edge plus inner structure for rust staining or holes - Trunk floor: Pull out the spare tire and peel back carpet—check for dampness and rust in corners where water collects - Hood and fender edges: Inspect hemmed seams where two metal layers join—these trap moisture through capillary action
Use a mechanic's mirror and flashlight to inspect hidden spots. A smartphone camera with flash can photograph tight spaces for reviewing later.
The "screwdriver test" assesses structural integrity: press a flat screwdriver tip firmly against suspected rust areas. Solid metal resists penetration; corroded metal lets the tip punch through with moderate pressure. Only use this destructive test on non-structural panels or when rust is already clearly visible.
Author: Lena Prescott;
Source: shafer-motorsports.com
Document what you find with photos and notes. Year-over-year comparison reveals how fast things are progressing and helps prioritize repairs. A small rust spot that hasn't grown in two years needs monitoring but not immediate action. Rapid expansion demands urgent treatment.
FAQ: Common Rust Prevention Questions
Successful rust prevention comes down to consistent application of protection methods matched to your conditions plus early detection habits. The specific products and schedules that work for a vehicle in Bar Harbor differ from what's needed in Colorado Springs or St. Petersburg, but core principles stay constant: keep moisture out, neutralize salt exposure, and inspect regularly for emerging corrosion.
What separates a twenty-year vehicle from an eight-year rust bucket boils down to deliberate maintenance decisions made before damage becomes visible. Frame rail corrosion doesn't suddenly appear overnight—it develops across years of neglected exposure. Once rust bubbles break through paint, internal damage has already compromised structural integrity.
Begin protection early, match treatment chemistry to your actual climate conditions, establish inspection routines, and maintain drainage systems. These practices cost less per year than two oil changes but preserve thousands in vehicle value while ensuring safety through prevented structural failure. Rust prevention isn't rocket science—it just demands understanding the specific vulnerabilities your vehicle faces and addressing them before oxidation gets started.
Related Stories
Read more
Read more


The content on Auto Insights is provided for general informational and educational purposes only. It is intended to offer guidance on car buying, vehicle ownership, finance, insurance, EVs, maintenance, accessories, reviews, and related topics, and should not be considered professional financial, legal, insurance, mechanical, or investment advice.
All information, tools, calculators, comparisons, and recommendations presented on this website are for general guidance only. Individual financial situations, driving habits, vehicle conditions, insurance policies, and market factors vary, and actual results or costs may differ from estimates provided.
Auto Insights makes no guarantees regarding accuracy, completeness, or current applicability of the information, as automotive markets, regulations, incentives, interest rates, and vehicle specifications may change over time.